
What is a trailer Actuator?
A trailer actuator is a braking system used between a vehicle and a trailer, with the purpose being to apply braking force to the trailer’s wheels.
Actuators typically apply brake pressure proportional to the driver’s pressure on the brake pedal within the tow vehicle.
There are many types of actuators, specifications and variations to understand.
Let’s learn how to choose an appropriate model, installation best practices, and test the functionality to help improve safety on our roads.

Part 1 – Meeting Driving Regulations
- Contact the roads and/or maritime authorities that apply to your area.
- Roads & Maritime Authorities provide information as to when an actuator system is required, as well as specifications.
- As a rule of thumb, the heavier the trailer, the higher the braking requirements.While you are on the phone, you may be able to ask about your trailer’s registration details, this is particularly helpful if you have bought a second-hand trailer and are unsure about its history.
- Ensure you are familiar with certain aspects of your vehicle.
- Gross Vehicle Mass (GVM). GVM is the weight of the trailer and the maximum load it is capable of carrying. This number is the cornerstone to defining what braking systems are required.
- Brake type. Brakes are usually either mechanical drum, hydraulic drum, electric drum, mechanical disc or hydraulic disc. Actuators are only compatible with hydraulic brakes. Actuators are not used for electric and mechanical brakes.
- Emergency braking systems required for your trailer classification. In the event your local roads/maritime authority doesn’t have all the information, contact the local trailer manufacturers in your area. Trailer manufacturers are typically registered and comply with the rules and regulations in their area. This means they may have helpful information for your situation, trailer and actuator.
Part 2 – Understanding Actuators
- Familiarise yourself with the basics of trailer actuators. This is a very important step before you choose your actuator.
- Not all trailers require brakes. For trailers that are physically small and lightweight, it may not be necessary to obtain a braking system. This is usually when the braking power of the driving vehicle is sufficient to safely control the vehicle and payload simultaneously.
- Actuators can be coupled with or without emergency braking devices. If a trailer becomes disconnected from a tow vehicle for any reason- the trailer can spear off and create a life-threatening hazard. For this reason, emergency braking systems – sometimes referred to as breakaway kits are used. These work by having a wire between the two, once the wire breaks, it will activate a battery and supply charge to the actuator – thus applying the brakes and slowing the uncontrolled trailer.
- Understand the design of different actuators. Most actuators are designed to be universal. It’s logical for manufacturers to adopt a universal design, it’s the right thing by people (for compatibility) and allows them to sell their product nationally. With hydraulic actuators, the wiring is basically exactly the same throughout the ranges of actuators available, so there’s very rarely any problems with wiring codes. Let’s take a quick look at the variable specifications.
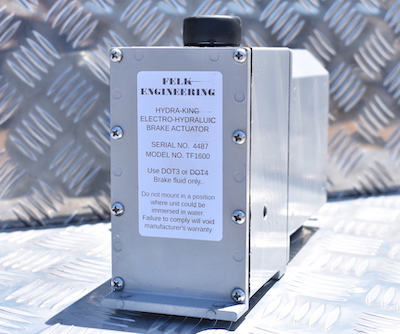
- PSI Rating – The PSI or Pounds Per Square Inch rating indicates the maximum pressure that can be applied to the brakes. For example, someone may purchase an actuator with 1600 PSI, however, when most people are braking, they are using approximately 600-700 PSI.
- Voltage Rating – The voltage of the actuator should, ideally, match the voltage rating of the car’s battery. For example, most cars are 12v, so a 12v actuator should be used. In contrast, heavy trucks may require a 24v battery to start the engine, in which case, seek an auto-electrician to convert the power to 12v supply to the actuator. A 12v actuator must have 12v supply.
- In-Cab Controller – An in-cab controller is a small device found inside the tow vehicle, which controls the braking ratio delivered to the trailer. The in-cab controller is an analogue wire between the brake pedal and the 7 pin plug at the back of the vehicle. Popular manufacturers include Hayman Reese, Tekonsha, Redarc, etc. As an example, if braking is too sensitive, reduce the power going to the trailer, or, if the load is heavier than usual, turn the dial-up so they’re not over or under-braking.
- Tip: Newer in-cab controllers may include inertia sensors to automatically adjust the braking power, however, this is not always the case. In-cab controllers do not connect to the car’s computer or ECU. While it is possible to not use an in-cab system, most countries will enforce drivers to have in-cab control of their brakes.
- Understand other replacement parts. In most cases, you do not need to replace other parts when replacing an actuator. Most wires, parts and other components are universal, plug and play. Now that we’ve ordered a model that’s right for us, let’s go ahead and install it.

Part 3 – Replacing an Old Actuator
- Ensure you are familiar with your country’s laws regarding actuators. Depending on the rules, you may or may not be required to have a licensed auto-electrician perform the installation. Additionally, you may be required to use an auto-electrician to retain your warranty. Wiring mistakes can lead to blown circuit boards, non-functional brakes and maintenance problems – be sure to get it right the first time.
- Turn off the power. Disconnect the trailer from the tow vehicle. Ensure there are no wires connected or power sources nearby.
- Remove the old actuator. Typically, removing an old actuator is a very simple process. Most manufacturers will bolt or screw their actuators onto the drawbar, so only a screwdriver is needed to remove them. Some manufacturers may glue their actuators on (not recommended), so isopropyl alcohol may be required to remove the adhesive components. Remove the old actuator.

Part 4 – Installing the New Actuator
- Place the actuator on the drawbar. A mounting bracket can be purchased from your supplier to suit your application, allowing for the actuator to be installed on almost any drawbar. This will be installed using a combination of bolts, u-bolts, and will be attached to the optional breakaway kit.
- Connect the wires. Typically, this is re-connecting the same coloured wires as was previously installed. Assuming the cables are in good condition, the same cables are re-used. Manufacturers of actuators should provide wiring diagrams, as well as technical support guides that may be helpful resources to have on-hand. In the event an auto-electrician requires further assistance installing the actuator, they should phone the technical support of the company they purchased it from. Hopefully, it’s a straight swap.
Part 5 – Testing the New Actuator
- Seek advice from professionals. It is always best to have the trailer professionally serviced on a regular basis, or before any long road trips. Engineers will service the actuator by checking pressure settings, as well as changing the brake fluid.
- Remember that actuators are powered-down when the tow vehicle is switched off. Actuators rely on the battery of the tow vehicle to operate. They do not apply braking power when the tow vehicle is switched off. An actuator has audible noises people can hear when they start their vehicle’s motor.
- Perform a driving test. The primary way to test if an actuator is fully functional is to perform a test drive as safely as possible. Continue the testing by applying gradual pressure on the brakes. Become familiar with the settings of the in-cab proportional brake controller.

Tips
- Wash down boat trailers with fresh water after every use, to prevent the buildup of salt
- Be mindful of servicing and brake fluid levels
- Keep your warranty information at hand, as well as technical support contacts
Warnings
- Do not submerge the actuator when using a boat ramp.